Monday, February 15, 2016

Fancy Star Block Tutorial


For the VMQG March block challenge we're going to make these blocks with black to grey prints and a bright print for the accent colour. You can use either black or grey for the background and the other for the star points.  You'll end up with a 10 inch block.

It's a traditional block, but modern fabrics give it a new look.


This is my edit of a fancy star block.  I've seen it at a workshop and in a magazine.  Here's my easy instructions for a 10 inch block.

Here's the fabric you'll need:

The four big squares will get cut into quarters diagonally, they are 5 1/4 inch squares.  You need 2 for the points of the stars, one for the centre accents and one background.
The centre snowball is a 4 1/2 inch square and the corners are four 1 1/2 inch accent squares that will become the triangles of the snowball.
The four outside corner squares are 3 1/2 inch squares.

Here are all the steps in one picture.  The orange lines are cut lines.

One step at a time instructions

First cut your fabric.  I accidentally made the centre block the same colour as the points.  OOPS.  Make it the same colour as your background for a lighter, airier star.


Cut the four big squares corner to corner into 4 triangles.


Sew the triangles into hourglass blocks and snowball the centre square.  Trim both blocks to 4 1/2 inches square.


Cut the bottoms off your hourglass blocks.  From the top, measure down 3 1/2 inches and cut off the extra accent colour edge.  The hourglass block will now be 3 1/2 by 4 1/2.


Lay them out and sew them together by rows, then sew the rows together.


The stars look airier if you use the background fabric for the centre, unlike the example in this tutorial.


Also note that the accent triangles aren't all the same size.  The more I fiddled with them, the less I was able to get them to touch each other at the points.  You know, the "galloping horse" rule applies here.

Friday, October 23, 2015

Low Volume Drunkard's Path Variations

I made a whole mess of 4 1/2 inch blocks and here are the two tops they turned into.

IMG_20151011_121908

And this one

IMG_20151012_212604 

I may try this one in Christmas fabrics as it looks a little like an ornament shape.

Wednesday, September 16, 2015

What does the FOX say

I got one Fancy Fox quilt done and sent off to Vernon BC for a new baby.  I think I'm a great uncle.  Emphasis on the GREAT!

IMG_20150915_092236

Sunday, August 30, 2015

Propeller blocks.

I won the pattern at our guild meeting a couple months ago and am now working with Japanese fabrics to make these cool propellers.  Hmmmm, do I want to make eight more blocks or just leave it this small size?

Paul shared a photo with you from the Flickr app! Check it out: https://flic.kr/p/x4XRDh

Friday, August 21, 2015

Some more traditional blocks for a baby quilt

Paul shared a photo with you from the Flickr app! Check it out: https://www.flickr.com/gp/28136612@N08/5BC904

Friday, May 9, 2014

Liquorice Allsorts

I had this idea of making a quilt of liquorice allsorts a few months ago and finally had a reason to do it.  The band I'm in is doing a concert this saturday and all the music have food in the titles.  We're playing Cherry Red, Green Onions, Raise Your Glass, Bach's Lunch, First Suite for Military Band, The Peanut Vendor, Agua de Beber, Dixieland Jam, and more.  I wanted to call the concert "The Hunger Games", but "Smorgasband" is what the rest decided.

We usually have a silent auction so I thought I'd make the Liquorice Allsorts quilt for this.


 I pieced in the square ones, and appliqued the other three.  I did the used dryer sheet trick for turning them inside out and getting the seam allowance tucked in.  the fabrics are 30s repros that had the right soft colours and are quite kid-like. 


 Here's the front.  I auditioned the candies on several colours and felt they really "popped" on this bright yellow-green.


The back has smaller allsorts that are staggered rather than angled.


 I got the label on with the band name and the quilt guild name.  It finished to 37 x 48 - 3 feet by 4 feet - a great size for a baby quilt.


 The quilting is a bunch of overlapping squares about the size of the allsorts filled with big zig-zags.

This was a really quick project.  I had the top started and pieced mostly on Friday after work.  I got the rest of the front and back pieced on Saturday (with a quick run to the LQS - local quilt store for more background) and then just layered it - spray glue 505- and got 1/3 of it quilted by Sunday evening.  Since the quilting is the part I like the least, i did little bits and pieces on Mon, Tues, Wed and put the binding on it Wed evening and got it washed.

Now it's off to the concert on Saturday to raise a bit of money for the band.


Saturday, March 1, 2014

Book Review: Modern One-Block Quilts by Natalia Bonner and Kathleen Whiting

Through the Vancouver Modern Quilt Guild and C&T Publishing, I was able to pick a book to review.  I chose the "Modern One-Block Quilts" by Natalia Banner and Kathleen Whiting as it sounded like a great book to see what can be done with the traditional idea of repeating the same block to make it modern.  This book does that and so much more.  It's a great book with amazing quilts that give a Modern spin on repeating the same block.

This book has 22 quilt projects each made from one repeating block.  Some of the blocks are very simple and some are very complex.

The book starts with a very short  “Sewing Basics” section.   There are quick how-tos on making snowballs, half square triangles, and flying geese.  The “no waste” flying geese instructions are great.  I’ve seen them several times, but never know where to find them when I need it.

Then there’s a short page on “Finishing the Quilt” with a paragraph or two on backing, batting and basting.    Binding gets two pages with instructions for making straight and bias binding.  A good resource if you need reminding or if you are a new quilter.

There is really no information on quilting or even suggestions of how to quilt each project.  But, in the full page pictures of the quilts you can see enough of the quilting on some of them for ideas on how you can finish your own.

Each quilt project starts with a full page picture of the quilt in a lovely setting, then ends with a full page picture of the entire quilt flat.

The instructions include 3 sizes for each quilt and the materials table and cutting table clearly give you requirements for each size.  There is also an assembly diagram clearly showing you the layout of the blocks for each size of quilt.

Most of the quilts in the book are made of solids and none of them have borders.  The look is really modern and the colours chosen for the pictured quilts are very hip and current.  Many of the quilts have a limited palette of 2 colours on a white or cream background.  This may sound boring, but the quilts look really
fantastic.

I paged through the book to see if there were any quilts that I would actually want to make as that’s my criteria of a good book.  There are 8 quilts that I really like in the book and another 3 that have interesting layouts that I’ll probably incorporate into future quilts.  So I can say this book is a winner.

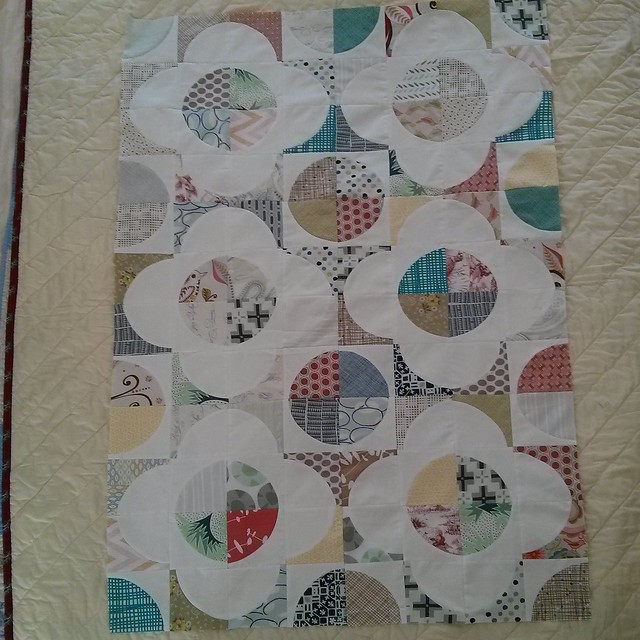
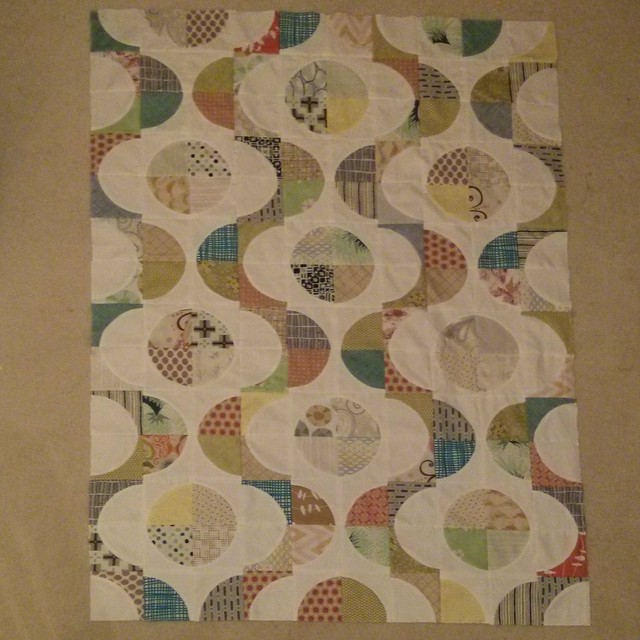
The instructions are clear, well presented.  The fabric requirements and cutting directions are laid out in a table, then the sewing instructions are given step by step.  I decided to try out the “Squared Scraps” quilt to see what following the instructions are like.   The yardage listed is quite generous, so you can make a couple mistakes and still have enough fabric to complete the size of quilt you select.

One minor complaint, they don’t tell you how many strips to cut for each element.  For example, for the Squared Scraps quilt, you need 48 pieces of white that are 3 ½ by 9 ½.  I wish they would say, “cut 10 3 ½ in strips, width of fabric, then cut them into 9 ½ in sections, each strip yields 4 segments.” That way you’d know how much to cut at once.

The sewing instructions are great and they even suggest what you can sew together before cutting if you want to strip piece some of the elements.

I got the baby size pieced on a Saturday using some hand dyed batics.

I highly recommend this book.  It is great for modern quilters and for traditional quilters who want to try something a little more modern.  There are so many great quilts in it that are graphic, bold, modern and beautiful.  The pictures are amazing, the instructions are clear for each size, and there are quilts that will appeal to all types of quilters.

Beginner quilters can find several amazing quilts that will be within their skill level, and experienced quilters can be challenged by some of the quilts. 

Friday, January 31, 2014

Oranges and Lemons

I'm finally using some of the fabric I batiked and dyed!
I started dying several fabrics in the same colours to create a bunch of fabrics that go together.  I just made strips and put them together for this top.  I call this one Oranges and Lemons. 

I thought the background might have been a bad choice, so I made the back with white...
and I added in a steely blue.  Each rectangular block is improvised with strips, blocks or boxes.  This turned out different from the hard boiled eggs quilt as on that one I used only a fat quarter of the featured print.  This one has lots of all the batiks and just a little of the blue and gold.  I think this will be a quilt that both sides will be liked.

Thursday, October 31, 2013

Workshop for the Sunshine Coast Quilter Guild Retreat 2013 - Part 2

More quilts from the workshop.

I love his one.  It's the colours and the retro feel to the printed fabrics that she used and all the solids.  The squares with the dark grey strips were added later because the quilt was looking very pale.
There are two more block to get added to the top or bottom to make it a bit longer.  By blocks, I mean sets of 4 quarter blocks. There's actually a wide strip of pieced "sashing" that winds through the quilt.  Can you find it?  She actually got this all sewn together by the end of the workshop.

Jennifer used a dark grey as her background colour.  The blocks were looking a little dark until she added in the orange and yellow.  Look at how wonky the angles turned out.  She used pointy "squares" to start out the bulls eye and got lots of motion in her blocks.  You can see a wide strip of pieced "sashing" going up and down.  Jennifer has more on the go to add in and she may make another block or two also.  I can't believe I didn't get more pics of this quilt while it was being made.

I didn't get a shot of this one while it was on the design wall.  We didn't have enough room once people got 4 or more bulls eye blocks cut up.  This one had a bit of a tailored look and there's thin piping along the seams of some of the blocks.  I like how the grey and yellow fabrics go together so well.  Great choices!  I hope she'll send me a picture of the finished quilt top.  I want to know how she'll put it together.  Will there be pieced sashing?

Here's another one without a white background.  I love the solid blocks that are scattered through the quilt.  They will be a great place to feature some fancy quilting. This quilt got done in half the time as she had to miss the first day of the workshop.
Notice there's some mini bulls eye blocks as well as the big quarter size blocks.  The mini ones have a cool folded centre square that adds a bit of 3D texture to the quilt.  I think she's going to make some more blocks to get this up to queen size.I got a quick lesson on how to do the fold to make that on-point square.  I just hope I can remember that special move after you do the first two centre folds.

Dale used a light batik for the background colour and a nice daisy print for the centre of each bulls eye.  This one turned out looking very restful and sweet, not the the angular grey and orange one sharing the design wall with her. She added background sashing to two sides of each block then got this up and down layout where the blocks are not all lined up in rows but sort of bounce around the quilt.  Most quilts made with this technique end up very angular and angry and a bit jarring, but here's one that looks pretty calm.

Carol's quilt blocks start out looking really west coast.  I love all the black and white prints she used and that red is perfect.  This layout isn't what she'll probably end up with.  We were just placing blocks and pieced sashing strips anywhere to get an idea of what could work. 


This one is another one with batiks and features a bright centre block
More blocks are being created to increase the size.  Looks like there will be orange centers mixed among the yellow centers.  I really like the mix of wide and narrow strips of  the colourful batiks.  The judicious use of bright red and dark blue scattered around all the similar greens really make this top interesting.  Note all the inclusions in the coloured strips and in some of the white background.  I think when the orange centered squares get mixed in it will look warmer perhaps.

This one turned out unexpectedly wonky.  The white fabric is a bit stretchy so some of the strips went a little wobbly, giving it a true Gees Bend look.  The centers of the bulls eye are a black and white fabric and that inspired adding narrow black and grey sashing between the blocks.  Look at all the little bits of colour in some of the black.

I am so amazed how different each quilt turned out.  We all used the save technique, but personalities start showing through the blocks.  I wonder as an exercize, what would happen if we all used the same fabric.  How different would each person's blocks end up?

I'm hoping to get pictures from the quilters as they get the top together.  I don't even need to see it quilted.  I'd love to see the final version of the top.  If it gets quilted, that would be a bonus!  We really didn't talk much about how to quilt the tops other than me suggesting an all-over boxy stipple would work, or half inch apart 'L' shapes in each block would work too.  Maybe something curvy would soften the quilt a bit, or maybe that would just look too out of place.

I think I talked everyone out of putting a border around their quilt.  My thought is a pieced sashing keeps the wonky improv look going.  Also no border makes it seem as if this may be a detail of a much larger piece of art.  The doesn't end at the edges, but keeps on going on and on.  A border would say, "This is it, there isn't any more."  The binding is all you need to edge this type of quilt.  The purple one on page 1 is probably the one that is closest to having a border, but since the internal sashing is just a wide, it's not really a border at all.

I came home on Sunday exhausted, but energized!  I may even finish of a couple of projects in the next couple weeks!

Thanks, Sunshine Coast Quilters for a wonderful retreat!

Monday, October 28, 2013

Workshop for the Sunshine Coast Quilter Guild Retreat 2013 - Part 1

Last weekend I headed up to Gibsons to give a two day workshop on the Gees Bend style quilt.  A year ago I drove up with all my quilts and quilt tops and did a trunk show about my journey from traditional to modern quilting.  There was enough interest so I got invited to do a workshop up there for their retreat.

It was so much fun.  I had 13 women in my workshop and below is a photo journal of what we accomplished over the 3 days of the 2 day workshop.  I don't know where that 3rd day came from!

I'm terrible with names, so I'll try to match up the names of the participants with their quilts.  Forgive me, ladies, if I get it wrong or if I really should have remembered your name and didn't. 

First, here's me working the room.

This one was all purple and green batiks to make the blocks.

And then with some really wide sashing, became a really Gees Bend looking quilt!  Those random pieces scattered in the sashing really give this one such a non-traditional look.  Sort of like naive outsider art.
 Just one more side to sash and it's done!

Here's the process that we used with the guild president Jeanette's blocks. Make a square bulls eye.
 Cut it into quarters and mix up the quarter blocks.
 Make more and scatter the quarters around. 

Notice the little "inclusions" in some of the strips.  The rule was if you have to sew two strips together to make it long enough, you had to cut in in the centre and add a contrasting fabric in the block, not at the end.  Of course, one extra bit is never enough, so you can see some strips have several inclusions.  Even some of the white background strips have inclusions.

Here's Kim's rust and green blocks.  She used the left-overs from another quilt that featured the leaf print that's in the centre of the blocks.  The little squares are 1/4 inch checkers she had pieced for the other quilt.  They made excellent inclusions scattered throughout the quilt.  Kim stayed up all night working on this "exploded block" layout.  She pretty much used up every scrap of black that she had.  She's actually hiding an area of white where there isn't enough black.
 This technique is harder to do with a coloured background for the blocks, but Kim was able to really make her's effective with the colours of the blocks, the black sashing and the layout.  I think she's almost exhausted her second wind in this shot.

Holly's blocks used a variegated green fabric.  The light end became the background and the dark end became one of the coloured strips.  I loved the coral fabric for the background, but I'm not sure what Holly has decided to use.  This is just the blocks laying on the yardage she brought.  I think she's making another block or two before she decides.

Part two coming up next.